BOMQuilts.com Home

Block of the Month Free Quilt Patterns
BOM:: Original Designs
BOM:: Traditional
BOM:: Smaller
BOM:: Row of the Month
BOM:: Medallion

Mystery Quilt Free Patterns
Mystery:: Original Designs
Mystery:: Others

Other Free Quilt Patterns
BOM::
Others
Quilt Accessories

Holiday-Themed Quilt Free Patterns
Valentine's Quilts
Easter & Spring Quilts

Patriotic Quilts
Halloween Quilt Fun
Thanksgiving

Christmas Free Quilt Patterns
Christmas Tree Skirts
Christmas Tables
Christmas Stockings
Christmas Quilts
Christmas Mantle Covers

Subscribe to our
Weekly
BOMquilts.com
eNews
Get the latest published
designs and information
to BOM and Mystery Quilts Online!
 
First name
E-mail address
You must add lists@queenme.com to your approved email list to receive the confirmation and our eNews.
 

From BOMquilts.com visitor Alice S:
"I want you to know this is the BEST website I have ever gone on! I just love to print the free BOM and making them will be so much fun! Please keep up the good work."
~ Thanks Alice! ~ BOMquilts.com


From BOMquilts.com visitor Lucinda:
"I LOVE your site!  Just found it yesterday.  Thank You, Thank You!"
~ Thanks Lucinda! ~ BOMquilts.com


TT Snow Days Snowman

A Fun Way to Celebrate Winter Without Mittens!

"TT Snow Days Snowman" featuring the "Snow Days" fabric line from Moda Fabrics

2006 Web Special Pattern from BOMQuilts.com &
AbbiMays.net featuring a little piecing and a little applique!

Print TT Snow Days Snowman Quilt Instruction Page as a .pdf

Print Face Templates as .pdf

Print Button Templates as .pdf

Finished Size 20" x 40"

Buy Your TT Snow Days Snowman Quilt Fabric Kit Here

Cutting Instructions
WOF = width of fabric

Piecing Instructions
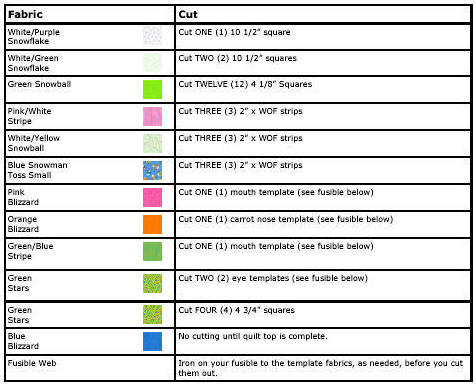
1)  Draw a diagonal line from corner to corner on all 12 of your Green Snowball 4 1/8” square fabrics.

2)  Line up your Green Snowball fabric square to the corner of one of the White/Green Snowflake 10 1/2” squares, right sides together, and sew ON the diagonal line you drew, as shown. Repeat for all four corners of each of the White/Green Snowflake and the White/Purple Snowflake fabrics. Press toward the Green Snowball fabric.

3)  Embellish your three blocks with the template pieces, with the top White/Green block having the face, the White/Purple block is the middle of the snowman and the remaining White/Green block is the bottom block. It’s optional to use a stabilizer, but it’s a good practice to get into when doing appliqué. Using a zigzag or blanket stitch, appliqué around the template pieces.

4) Next, sew your 2” strips together, one fabric strip per color - you will end up with THREE (3) completed strips. Be sure to sew in OPPOSITE directions when you change fabrics to avoid the fabric ‘bending.’ Press outward on each strip.

5) Now, it’s time to put your TT Snow Days Snowman together!

6) Finally, make your quilt sandwich with the Blue Blizzard as the backing and quilt your quilt. We turned the backing over, with a 1/2” seam allowance, from the back of the quilt to the front and stitched the binding down from the front.

How cute is that?!


Thank you for sharing in this fun TT Snow Days Snowman project with BOMquilts.com!


© 2006 All Rights Reserved
BOM Quilts ~ Quiltalicious, LLC